"DevOps Mastery: Step-by-Step Guide to Deploying 2-Tier Flask App with Docker and EKS"
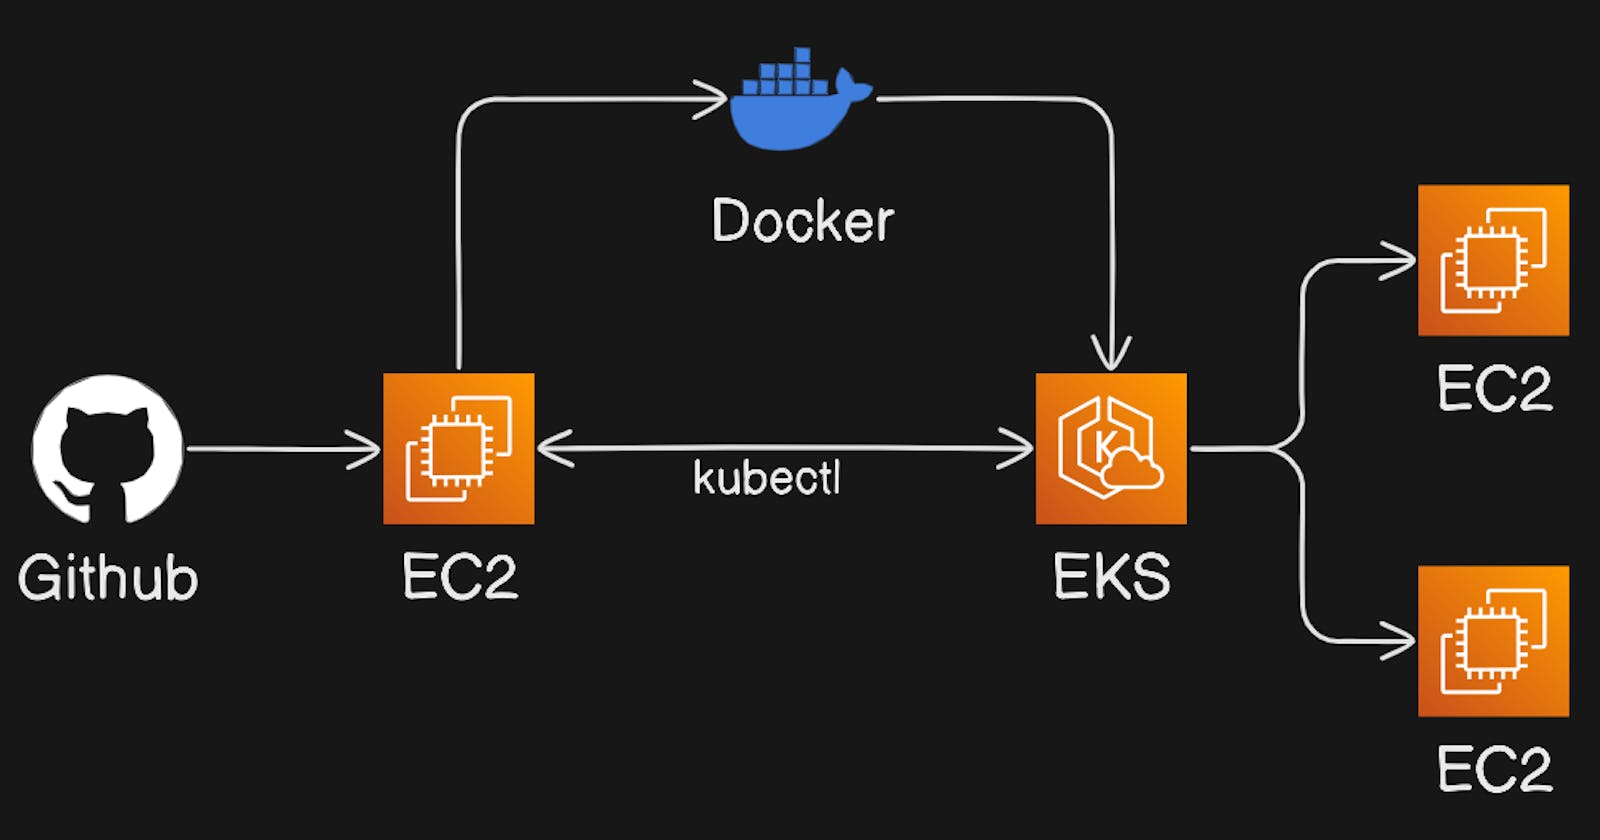
Welcome to the world of DevOps, where we're about to take you on a journey to deploy a 2-tier Flask application using some cool technologies. In this blog, we'll break down the process of creating a strong development pipeline that involves GitHub, Docker, AWS Elastic Kubernetes Service (EKS), and Helm for managing Kubernetes.
Our project is all about a 2-tier Flask application, showcasing the flexibility and scalability of today's web development. This app lives on GitHub and is the heart of our deployment process. Find everything you need, including files and resources, in this dedicated repository:
https://github.com/shubzz-t/2_tier_app_deploy_Flask_Mysql
Step 1: Image Handling using Docker
Creating the Ubuntu EC2 instance:
Choose an "Ubuntu" AMI image.
Select the
t2.microinstance type.Configure instance details, add storage, and add tags as needed.
Configure security groups to allow SSH (port 22) access.
Review the configuration and launch the instance.
Create or select an existing key pair for SSH access.
Use SSH to connect to your instance:
ssh -i your-key.pem ec2-user@your-ec2-instance-ip
Installing and configuring the docker:
Follow the below commands to install and configure docker:
  #Command to update the packages
  sudo apt update

  #Command to install the docker
  sudo apt install docker.io

  #Command to start docker
  sudo systemctl start docker

  #Command to enable or start docker at boot
  sudo systemctl enable docker

  #Command to add current user to docker group
  sudo usermod -aG docker $USER

  #Command to give permission to docker.sock file
  sudo chmod 666 /var/run/docker.sock
Build and push image to docker-hub:
Go inside the 2_tier_app_deploy_Flask_Mysql folder of cloned repository where the Dockerfile is present to build the image from Dockerfile and run command:
  #Command to build image you can also change tag according to you
  docker build -t shubzz/flask:latest .

  #Command to login into dockerhub and next enter userid and password
  docker login

  #Command to push image to dockerhub
  docker push shubzz/flask:latest
Step 2: Creating EKS cluster:
Install AWS CLI:
Install and configure the AWS Command Line Interface (CLI) on your local.
  curl "https://awscli.amazonaws.com/awscli-exe-linux-x86_64.zip" -o "awscliv2.zip"

  unzip awscliv2.zip

  sudo ./aws/install
Create an IAM Role for EKS:
Create an IAM role with the necessary permissions for EKS.
Go to the AWS IAM console.
Create a new IAM user named "eks-admin."
Attach the "AdministratorAccess" policy to this user.
- After creating the user, generate an Access Key and Secret Access Key for this user.
Configure AWS CLI:
Configure aws cli using below command and put the access key and secret access key generated in step 2.
  #Command to configure aws cli
  aws configure
Install kubectl:
Commands to install kubectl
  curl -o kubectl https://amazon-eks.s3.us-west-2\.amazonaws.com/1.19.6/2021-01-05/bin/linux/amd64/kubectl

  chmod +x ./kubectl

  sudo mv ./kubectl /usr/local/bin

  kubectl version --short –client
Install eksctl:
Commands to install eksctl
  curl --silent --location "https://github.com/weaveworks/eksctl/releases/latest/download/eksctl_$(uname -s)_amd64.tar.gz" | tar xz -C /tmp

  sudo mv /tmp/eksctl /usr/local/bin

  eksctl version
EKS Cluster Setup:
Use eksctl to create the EKS cluster.
NOTE: Make sure to replace and region name and other values with your desired values.
eksctl create cluster --name my-cluster --region regioncode --node-type t2.micro --nodes-min 2 --nodes-max 2
Verify Nodes:
Use the below command to verify the cluster creation.
kubectl get nodes
Step 3: Deploying the app on EKS cluster:
Deploying the MySQL container:
Navigate to the EKS Manifest Folder:
cd eks_manifestsApply the yaml files:
  kubectl apply -f mysql-configmap.yml
  kubectl apply -f mysql-secrets.yml
  kubectl apply -f mysql-deployment.yml
  kubectl apply -f mysql-svc.yml
This assumes that the YAML files (
mysql-configmap.yaml,mysql-secrets.yaml,mysql-deployment.yaml, andmysql-service.yaml) are correctly configured in theeks_manifestsfolder.The service type for the mysql is default i.e. cluster IP.
Copying the mysql service IP:
We need to copy the cluster IP on which the mysql service is running for that we need to use command.
kubectl get svcFrom the above command output we need to copy the CLUSTER-IP which corresponds to our mysql service.
Deploying the Flask container:
Before running the manifest for the Flask, we need to change the value of the MYSQL_HOST field with the copied CLUSTER-IP inside the two-tier-app-deployment.yml file so that the flask app can connect to the MySQL service on that host IP.
Apply the yaml files for flask:
  kubectl apply -f two-tier-app-deployment.yml
  kubectl apply -f two-tier-app-svc.yml
Inside you two-tier-app-svc.yml you will be able to know the port on which to access you application in this case it is port 30007, so you will be able to access your two application on the cluster_ec2_ip:30007.
You can also change the service to the load balancer and then you can hit the load balancer endpoint URL to access the two tier application.
Conclusion: Mission Accomplished!
And that's a wrap! You've successfully navigated the intricacies of DevOps, deploying a 2-tier Flask app with GitHub, Docker, and AWS EKS. From setting up an EC2 instance to orchestrating Kubernetes magic, you've mastered the art of cloud-native deployment.
Highlights:
GitHub Repo: Your app lives on GitHub, ensuring collaborative and version-controlled development.
Docker : Created a Docker image, pushing it to Docker Hub for accessibility.
EKS : Witnessed the power of EKS, Kubernetes for scalable and resilient deployments.
Thanks for Joining Us:
A huge thank you for joining us on this DevOps journey! If you have questions, thoughts, or want to share your experiences, we'd love to hear from you. Happy coding, and may your apps always scale to new heights!
